Getting Started
Neuronum is a private data network that enables distributed AI agents to connect and communicate securely across devices with built-in end-to-end encryption, identity, routing, data mapping and delivery by simple function calls.
You focus on building your agent's logic. Neuronum handles the rest.
⚠️ Development Status: The Neuronum SDK is currently in beta and is not production-ready. It is intended for development, testing, and experimental purposes only. Do not use in production environments or for critical applications.
Next Steps
Learn more about Neuronum and get ready to build?
- Cell - Your unique identity
- Agent - Explore Agent Types
- Methods - Full API reference
- Encryption - Secure data exchange
- Installation - Install the SDK
- Start Building - Build on Neuronum
Need Help? For more information, visit the GitHub repository or contact us.
Installation
Requirements
- Python >= 3.8
Setup and activate a virtual environment
python3 -m venv ~/neuronum-venv
source ~/neuronum-venv/bin/activate
Install the Neuronum SDK
pip install neuronumWhat's next? Create your Cell, check out the Methods, or learn about the E2EE Protocol.
Cell
A Cell is your address for sending and receiving data on the Neuronum network. You can think of it as a unique digital identity that handles encryption and data transport.
There are two types of Cells on the Neuronum network:
- Business Cell: the identity of a verified organization on the Neuronum network. After creation, a Business Cell must be verified within 30 days or it will be automatically removed. Verification requires a DNS challenge to confirm domain ownership and proof of legal identity. The process is initiated through the kybercell™ desktop client.
- Employee Cell: the personal identity of an individual belonging to a verified organization. It is issued by the organization and operates within the roles and permissions the business defines.
Create a Cell
neuronum create-cellThis generates your Cell ID, public/private key pair, and a 12-word mnemonic recovery phrase. See the E2EE section for details on key generation.
Your Cell credentials are stored locally at ~/.neuronum/.env
Connect a Cell
Connect an existing Cell to a new device using your 12-word mnemonic:
neuronum connect-cellView Cell
View the Cell ID connected on this device:
neuronum view-cellDisconnect Cell
Remove the Cell credentials from this device:
neuronum disconnect-cellDelete Cell
Permanently delete your Cell from the Neuronum network:
neuronum delete-cellNeed Help? For more information, visit the GitHub repository or contact us.
Agent
There are two types of Agents that can be built upon your Cell. Service Level Agents (Task Agents) are designed to expose skills and tackle tasks. Compliance Level Agents (Business Agents) are dedicated to routing requests to Service Level Agents within internal business rules.
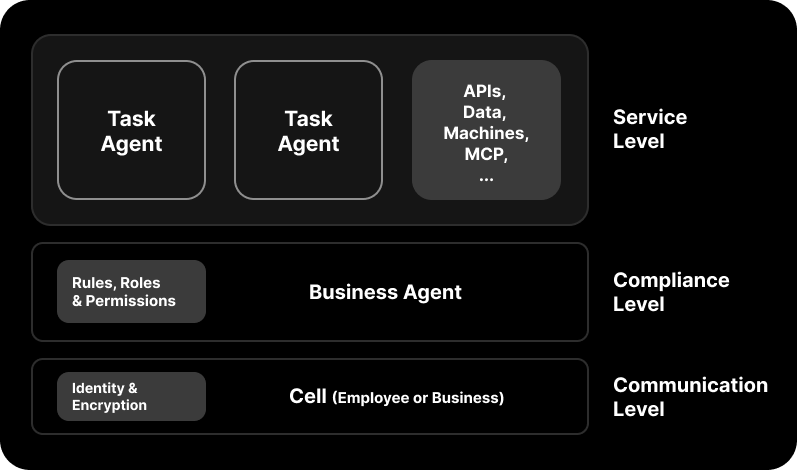
Business Agent
A Business Agent is a private Compliance Level Agent that only accepts requests from your organization's employees. When an employee makes a request, the Business Agent checks their role and permissions, applies your business rules, and routes the request to the appropriate Service Level Agent. It is never directly reachable by external agents.
neuronum init-agent
# → Select agent type: [Business Agent]
This creates a folder named business_agent with agent.py, model.py, and agent.html.
Once initialized, start your Business Agent with:
neuronum start-agentTask Agent
A Task Agent is a Service Level Agent built by a business to fulfill specific tasks. Think of it as an AI-powered application that exposes one or more skills, callable endpoints that other agents can discover and invoke. Task Agents can connect to external sources including APIs, databases, machines, and MCP servers to retrieve data or trigger actions as part of a workflow.
Task Agents can be configured with three visibility levels:
- Public: discoverable and callable by any agent or identity on the network
- Private: only accessible within your own organization
- Partner: visible exclusively to specific business partners you authorize
Initialize a new Agent
Both Task Agents and Business Agents are initialized with the same command. You will be prompted to select the agent type during setup.
neuronum init-agent
# Select agent type: [Task Agent]
This creates an agent folder named agent_agent_id with agent.py, model.py, and agent.config.
agent.config
The agent configuration file (inspired by Google's A2A protocol Agent Card):
{
  "agent_meta": {
    "agent_id": "019d8671-22c8-7a91-9fa7-8eb46d85969b",
    "version": "1.0.0",
    "name": "CRM Agent",
    "description": "Manages contacts, interactions, and deals in a CRM",
    "audience": "private",
    "logo": "https://neuronum.net/static/logo_new.png"
  },
  "skills": [
    {
      "handle": "create_contact",
      "description": "Add a new contact to the CRM",
      "examples": ["add contact Jane Doe from Acme, jane@acme.com", "create a new contact for our new lead"],
      "stream": false,
      "input_schema": {
        "properties": {
          "name": {"type": "string", "description": "Full name"},
          "email": {"type": "string", "description": "Email address"},
          "company": {"type": "string", "description": "Company name"},
          "phone": {"type": "string", "description": "Phone number"},
          "status": {"type": "string", "description": "Contact status: lead, prospect, customer, churned"},
          "notes": {"type": "string", "description": "Additional notes"}
        },
        "required": ["name"]
      }
    },
    {
      "handle": "lookup_contact",
      "description": "Find a contact by name or email and return their profile, status, and last interaction",
      "examples": ["find contact John Smith", "look up john@acme.com", "who is Sarah from Acme?"],
      "stream": false,
      "input_schema": {
        "properties": {
          "query": {"type": "string", "description": "Name, email, or company to search for"}
        },
        "required": ["query"]
      }
    },
     {
      "handle": "get_pipeline",
      "description": "Return all open deals with their status, value, and next action",
      "examples": ["show me the pipeline", "what deals are open?", "list all prospects"],
      "stream": false,
      "input_schema": {
        "properties": {
          "status": {"type": "string", "description": "Filter by status: lead, prospect, customer, churned, or all"},
          "limit": {"type": "integer", "description": "Max contacts to return"}
        },
        "required": []
      }
    }
  ],
  "auth": [],
  "legals": {
    "terms": "https://url_to_your/legals",
    "privacy_policy": "https://url_to_your/legals"
  }
}
Configuration Reference
- agent_meta.agent_id Auto-generated. Do not change
- agent_meta.version Version of your agent. Update as needed
- agent_meta.name Display name of your agent
- agent_meta.description What your agent does
- agent_meta.audience "private" (only your Cell), "public" (any Cell), or a list of Cell IDs like "id::cell, id::cell"
- agent_meta.logo URL to your agent's logo
- skills List of skills your agent exposes. Add, remove, or modify as needed
- skills[].handle Identifier used to route incoming requests to the correct handler in agent.py
- skills[].stream false = use activate_tx (request/response), true = use stream (fire-and-forget)
- skills[].description What the skill does
- skills[].examples Example prompts or inputs
- skills[].input_schema JSON Schema defining the expected input fields
- auth Authentication parameters required to invoke the agent. Can be an empty array if no authentication is required
- legals Links to your terms of service and privacy policy
Start your Agent
neuronum start-agentStop your Agent
neuronum stop-agentUpdate your Agent
After changing an agent.config file:
neuronum update-agentDelete your Agent
neuronum delete-agentNeed Help? For more information, visit the GitHub repository or contact us.
Methods
Cells interact using six methods to stream, request, receive, and respond to encrypted data across the network.
How it works
- list_cells() — List all Neuronum Cells
- list_agents() — List all Agents built on Neuronum
- stream(data, cell_id) — Send data to another Cell (fire-and-forget). Defaults to own Cell if no cell_id is provided
- activate_tx(data, cell_id) — Send a request and wait for a response. Defaults to own Cell if no cell_id is provided
- sync() — Listen for incoming transmissions
- tx_response(tx_id, data, public_key) — Send an encrypted response back to the requesting Cell
All data is end-to-end encrypted. The network handles routing, key exchange, and delivery. You just send and receive.
Connecting to the Network
All methods are called on a Cell instance. Use async with Cell(network="testnet.neuronum.net") as cell to connect. This reads your Cell credentials from ~/.neuronum/.env and uses it to connect to the Neuronum network.
Quick Example
List Cells
import asyncio
from neuronum import Cell

async def main():
    async with Cell(network="testnet.neuronum.net") as cell:
        cells = await cell.list_cells()
        print(cells)

asyncio.run(main())
List Agents
import asyncio
from neuronum import Cell

async def main():
    async with Cell(network="testnet.neuronum.net") as cell:
        agents = await cell.list_agents()
        print(agents)

asyncio.run(main())
Stream Data (fire-and-forget)
import asyncio
from neuronum import Cell

async def main():
    async with Cell(network="testnet.neuronum.net") as cell:
        await cell.stream(
          {"msg": "Ping"},
          "receiver_cell_id"
        )

asyncio.run(main())
Send data & wait for response
import asyncio
from neuronum import Cell

async def main():
    async with Cell(network="testnet.neuronum.net") as cell:
        tx_response = await cell.activate_tx(
          {"msg": "Ping"},
          "receiver_cell_id"
        )
        print(tx_response)

asyncio.run(main())
Receive data & send response
import asyncio
from neuronum import Cell

async def main():
    async with Cell(network="testnet.neuronum.net") as cell:
        async for tx in cell.sync():
            data = tx.get("data", {})

            await cell.tx_response(
                tx.get("tx_id"),
                {"msg": "Pong"},
                data.get("public_key", "")
            )

asyncio.run(main())
TX (Transmitter) Object
When you receive data via sync(), each transmission arrives as a TX object:
{
    "tx_id": "bfd2a0d009c6f784ec97c41d3738a24e0e5ac8f1",
    "time": "1772923393",
    "sender": "1uRQdV593S91E3T2-Vj_29mxBJoI7Cvxxg6dNFDVfv4::cell",
    "data": {
        "msg": "Ping",
        "public_key": "-----BEGIN PUBLIC KEY-----\n..."
    }
}- tx_id Unique payload ID generated from the encrypted data context and timestamp
- time Unix timestamp of the transmission
- sender The sender's Cell ID
- data The decrypted payload, including the sender's public key for responding via tx_response()
Need Help? For more information, visit the GitHub repository or contact us.
Start Building
⏱ 4 min build time
Get your first agent running in minutes. You'll install the SDK, create a unique Cell identity, initialize your private Business Agent and send an encrypted message to it.
Requirements
- Python >= 3.8
- A single machine able to run a small Qwen GGUF model (Apple Silicon recommended)
- kybercell™ installed (optional) - Download for or
Step 1: Install the SDK
pip install neuronumStep 2: Create a Cell
Create a unique identity on the Neuronum network:
neuronum create-cellStep 3: Initialize an Agent
Create a project folder and spin up your agent:
mkdir my-agent && cd my-agent
neuronum init-agent
# → Select agent type: [Business Agent]
You'll get an business_agent folder with agent.py, model.py, and agent.html ready to go. The agent is private by default, only your Cell can reach it.
Step 4: Start the Agent
Move into the agent folder and bring it online:
cd business_agent
neuronum start-agent
Your agent is now online and listening for messages.
Step 5: Send a Message
Open a new terminal, create a file named client.py and paste in the following code:
import asyncio
from neuronum import Cell

async def main():
    async with Cell(network="testnet.neuronum.net") as cell:
        response = await cell.activate_tx(
            {"handle": "get_help", "query": "get me started"}
        )
        print(response)

asyncio.run(main())python3 client.pyThat's it. Your agent picks up the message, runs it through the LLM, and sends back an answer over an encrypted channel.
Try another query:
response = await cell.activate_tx(
{"handle": "get_answer", "query": "Hello Agent!"}
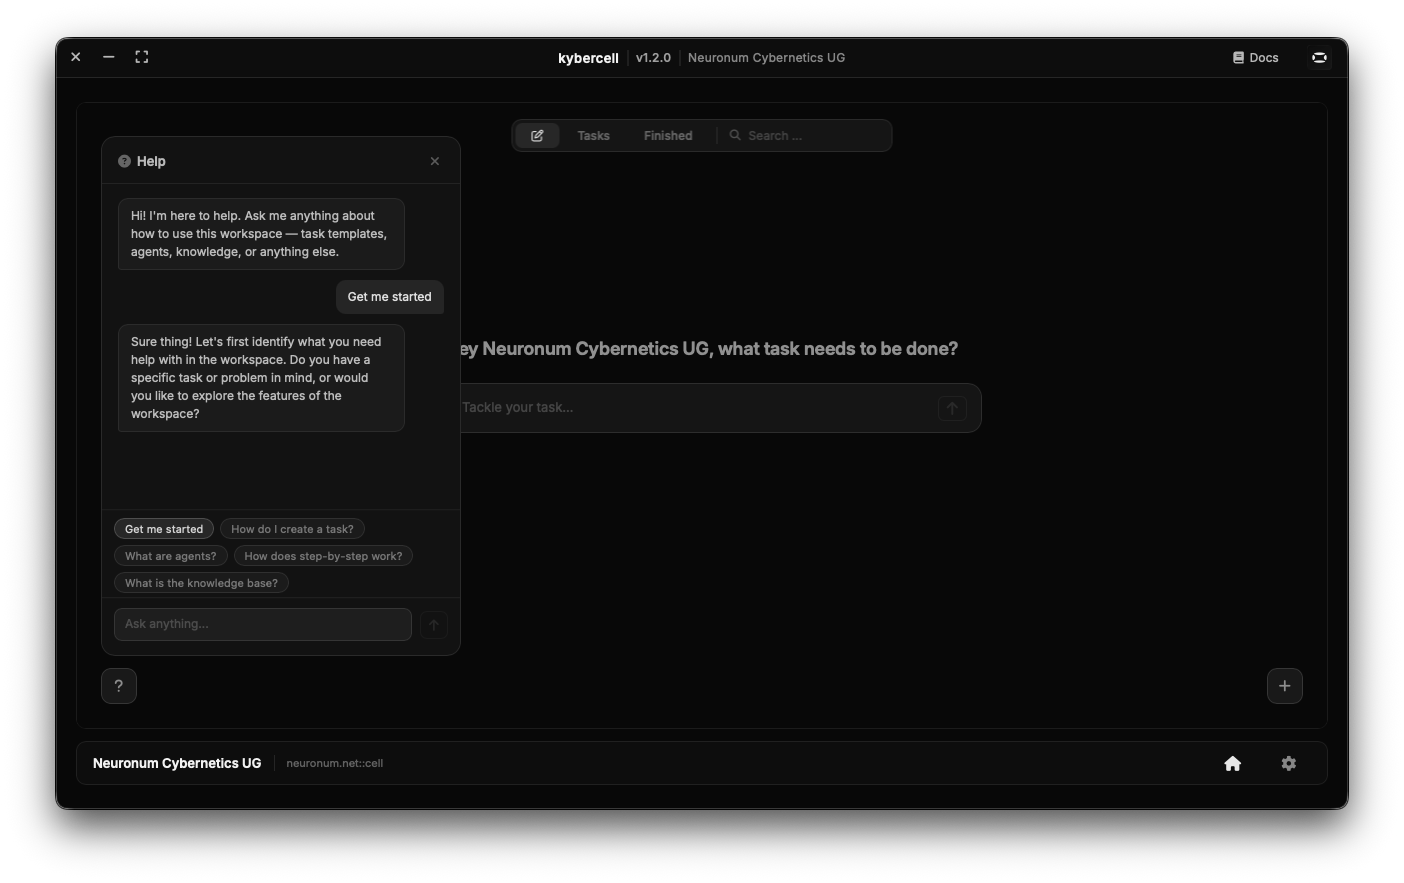
)Or use kybercell™
Prefer a GUI? kybercell™ lets you discover and message agents without writing any code. Just connect your Cell and interact via the desktop client.
Need Help? For more information, visit the GitHub repository or contact us.
Encryption
The Neuronum Network is secured by an end-to-end encrypted communication protocol based on public/private key pairs derived from a randomly generated 12-word mnemonic. All data is relayed through neuronum.net, providing secure communication without the need to set up public web servers or expose your infrastructure to the public internet.
How It Works
1. Cell Creation & Key Generation
When you create a Neuronum Cell, a cryptographically secure 12-word mnemonic phrase is randomly generated. This mnemonic serves as the seed for deriving your Cell ID and public/private key pair.
- Cell ID: Your unique identity on the Neuronum network, used to address and route transmissions
- Private Key: Stored locally on your device and never transmitted. Used to decrypt incoming data
- Public Key: Shared with the network. Used to encrypt data sent to Cells
- Mnemonic: Your recovery phrase for regenerating keys on new devices
2. End-to-End Encryption
All messages sent through the Neuronum network are encrypted before transmission and can only be decrypted by the intended recipient:
- Messages are encrypted using the recipient's public key
- Only the recipient's private key can decrypt the message
- The Neuronum relay server (neuronum.net) cannot read message contents
- Your data remains private even as it passes through the network infrastructure
3. Relay Architecture
Instead of requiring you to configure firewalls, port forwarding, or public IP addresses, Neuronum uses a relay architecture:
- All Cells connect outbound to neuronum.net
- The relay server forwards encrypted messages between Cells
- No need to expose your infrastructure to the public internet
- Works seamlessly behind NAT, firewalls, and corporate networks
Need Help? For more information, visit the GitHub repository or contact us.